

5 Steps to Embroider for the First Time Without Frustration
Last Updated: November 5, 2026
Quick Summary
To start embroidery for beginners, gather just three supplies: fabric, floss, and a needle, and skip the rest. Learn the running stitch, backstitch, and satin stitch, then transfer your pattern and stitch outline first, fill second, details last.
- Beginners need only fabric, floss, and a needle to start.
- Three stitches cover almost every beginner pattern: running, backstitch, satin.
- Work outline first, fill second, and details last on your first project.
- Test any marker on a scrap first because some inks set permanently after ironing.
- A small ornament makes a satisfying second finish.
Table of Contents
- Step 1: Gather Beginner Embroidery Supplies (and Skip the Rest)
- Step 2: Learn Three Easy Embroidery Stitches for Beginners
- Step 3: How to Transfer Embroidery Patterns to Fabric
- Step 4: Stitch Your First Project From Start to Finish
- Step 5: Finish the Back and Plan Your Next Project
- Frequently Asked Questions
Step 1: Gather Beginner Embroidery Supplies (and Skip the Rest)
If you want embroidery for beginners without frustration, start with less. Beginners need three things: fabric, floss, and a needle. At Artsi2, we build our beginner kits around that short list because most starter kits sell tools you will never touch.
Here is what actually earns a spot on your table:
- Fabric: precut wool felt pieces, as included in our beginner kits
- Floss: Perle Cotton 8, as included in our beginner kits
- Needle: included in our beginner kits
Skip the rest for now. For a deeper breakdown, read our guide on what you need to start hand embroidery, or browse easy hand embroidery kits for beginners that arrive with every material included.
Step 2: Learn Three Easy Embroidery Stitches for Beginners
Three stitches cover almost every beginner pattern: the running stitch, the backstitch, and the satin stitch. Learn these and you can finish a small design without reaching for a tutorial mid-stitch.
Running stitch: push the needle up, then down, making even dashes.
Backstitch: come up one stitch ahead, then back into the end of the previous stitch. The result is a solid, unbroken line.
Satin stitch: work straight stitches side by side to fill a shape. Keep them close and do not pull tight, or the fabric will pucker.
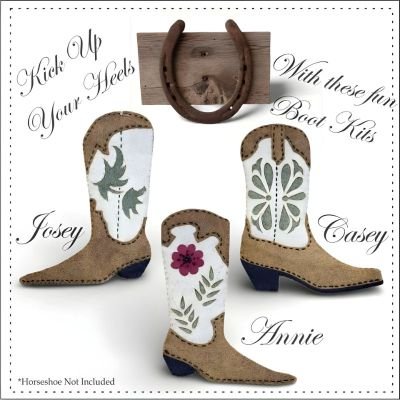
Ready to practice right away? Our Cowboy Boot hand embroidery stitch kit for beginners comes with precut wool felt, perle cotton, and a needle, so you can try all three stitches on a real project.

Cowboy Boot Hand Embroidery Stitch Kit for Beginners by Artsi2
Three stitches cover almost every beginner pattern, and each one has a simple motion to master.
Cowboy Boot Hand Embroidery Stitch Kit for Beginners by Artsi2 →
Stitch |
How to work it |
Result |
|---|---|---|
Running stitch |
Push needle up, then down, making even dashes |
Even dashes |
Backstitch |
Come up one stitch ahead, then back into previous stitch end |
Solid, unbroken line |
Satin stitch |
Work straight stitches side by side to fill a shape |
Filled shape; keep close, do not pull tight |
Step 3: How to Transfer Embroidery Patterns to Fabric
Pattern transfer is where embroidery for beginners loses confidence, so pick the method that matches your fabric and tools.
For cotton or linen, these methods work well:
- Light method: tape the pattern to a sunny window, then trace over it
- Water-soluble pen: draw the design directly, then rinse it out
- Tear-away stabilizer: stitch through the paper, then tear it away
Test any marker on a scrap first. Some inks set permanently after ironing.
Once your design is marked, plan the fun part. Our post on easy embroidery projects for craft nights has ideas for a relaxed evening with friends.
Step 4: Stitch Your First Project From Start to Finish
Start Hand Embroidery: What You Actually Need to Begin
Step 5: Finish the Back and Plan Your Next Project
Then decide what comes next. A small ornament makes a satisfying second finish.
Frequently Asked Questions
What do I need to embroider for the first time?
You need three things: fabric, embroidery floss, and a needle. A beginner kit bundles all of these so nothing is missing. Artsi2 kits include precut wool felt pieces, Perle Cotton 8 floss, and a needle, plus written instructions with illustrations. Start with a small design like a 5x5 inch heart or a 3.5x4 inch ornament. Skip extras like thimbles, hoops stands, or full floss collections until you finish one project and know you enjoy the process.
How many strands of embroidery floss should a beginner use?
Most beginner projects use two or three strands. Perle Cotton 8, the floss included in Artsi2 kits, is used as it comes. If you buy six-strand floss, cut a length, separate the strands, and use two for fine lines or three for bolder shapes. Fewer strands give a delicate look; more strands fill space faster. Try one small sample with two strands and one with three to see which you prefer before starting your main design.
How do you start embroidery without a knot?
Thread your needle, then anchor the tail by stitching two or three small running stitches under where your design will cover, or leave a short tail on the back and catch it under your first few stitches. This waste-knot or anchor-stitch method keeps the back flat and avoids bumps that show through fabric. It also makes finishing easier because there is no knot to hide.
Learning to embroider is not about talent. It is about starting with materials that cooperate and a project small enough to finish. That is exactly how we design every Artsi2 kit: precut wool felt, perle cotton, needles, and illustrated instructions, all made in the USA. Subscribe to our emails and we will send you new kit releases and beginner-friendly project ideas.
